Hardie Board Siding Painting A Comprehensive Guide
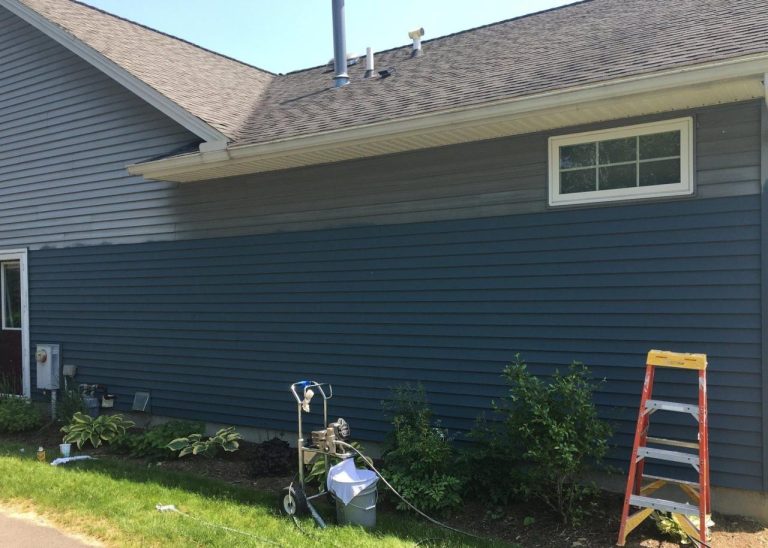
Hardie board siding painting is a significant undertaking, requiring careful consideration and planning. This guide provides a detailed overview, from prepping the surface to achieving a professional-looking finish. We’ll explore various paint types, application techniques, and maintenance strategies to ensure your Hardie board siding looks its best for years to come.
The guide will walk you through everything from cleaning and preparing the siding to choosing the right paint and applying it correctly. It covers different painting methods, common issues, and maintenance tips to help you avoid costly mistakes and achieve lasting results. Whether you’re a seasoned DIYer or a first-timer, this guide will equip you with the knowledge to paint your Hardie board siding with confidence.
Introduction to Hardie Board Siding Painting

Source: repaintnow.com
Hardie board siding, a popular choice for exterior walls, is a fiber-cement composite material. Its composition provides a durable and long-lasting surface, but its unique properties also necessitate careful consideration when it comes to painting. Understanding these properties is crucial for achieving a professional-looking and lasting finish.
Painting Hardie board siding offers several advantages, including the ability to enhance the aesthetic appeal of a home and protect it from the elements. However, the process also presents certain challenges, primarily related to the material’s unique composition and the need for specific preparation and paint types. Choosing the right paint and following proper application techniques is essential to avoid costly mistakes and ensure a beautiful and long-lasting result.
Hardie Board Siding Characteristics
Hardie board siding is known for its durability, resistance to rot, insects, and fire. Its fiber cement composition makes it a relatively low-maintenance material. This resilience is a major benefit for homeowners, as it reduces the need for frequent repairs and replacements. However, this very durability necessitates specific approaches for effective painting. The material’s surface texture and composition require careful preparation and selection of the right paint to achieve optimal results.
Benefits of Painting Hardie Board Siding
Painting Hardie board siding offers several advantages. It allows homeowners to personalize the appearance of their homes by choosing from a wide range of colors. The application of paint also creates a protective layer against the elements, including moisture, UV radiation, and extreme temperatures. This protection extends the lifespan of the siding, reducing the need for costly replacements. Furthermore, a fresh coat of paint can significantly increase the curb appeal of a property, potentially boosting its resale value.
Drawbacks of Painting Hardie Board Siding
Painting Hardie board siding does present some drawbacks. The material’s inherent hardness requires specialized preparation and paint types to achieve optimal adhesion and longevity. Proper surface preparation is crucial to ensure the paint adheres effectively and lasts for many years. Additionally, the material can be more challenging to work with than other siding options. Lastly, the cost of professional painting services may be higher than for other siding types.
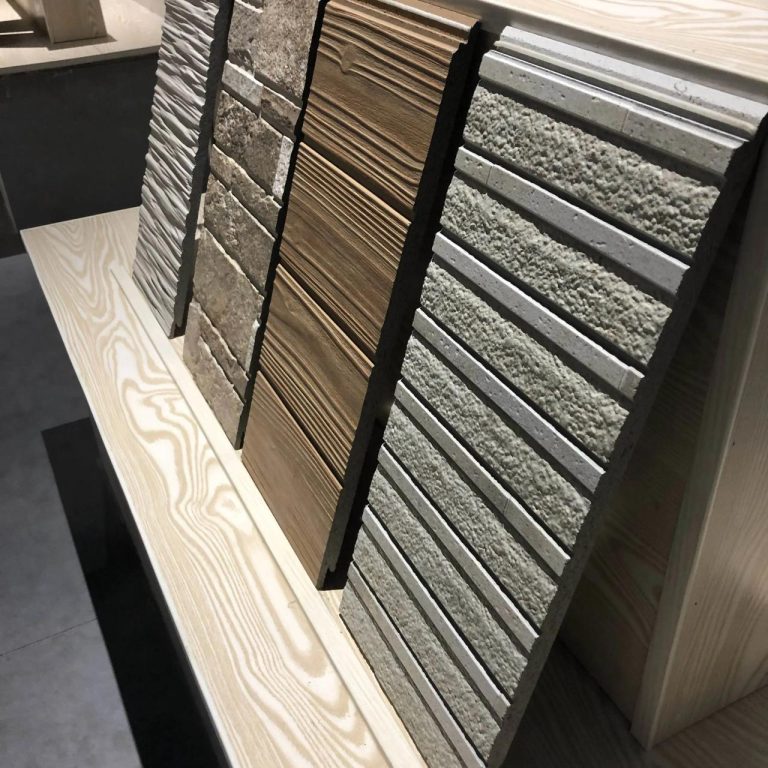
Suitable Paint Types for Hardie Board
Hardie board siding requires paints specifically formulated for fiber cement. These paints are designed to adhere well to the material’s surface and resist the effects of moisture, UV exposure, and temperature fluctuations. Acrylic latex paints are a common choice, but specialized acrylic-urethane paints are often recommended for superior durability. Some manufacturers offer paint lines specifically designed for Hardie board, ensuring compatibility and optimal performance.
Importance of Proper Surface Preparation
Thorough surface preparation is paramount for successful Hardie board painting. This includes cleaning the siding to remove dirt, mildew, loose paint, and other debris. Repairing any damaged or deteriorated sections of the siding is also critical. Priming the surface with a suitable primer is a critical step to enhance paint adhesion and provide a uniform base for the topcoat. This careful preparation ensures that the paint adheres effectively and lasts for many years.
Paint Type Comparison for Hardie Board Siding
| Paint Type | Pros | Cons | Cost | Durability |
|---|---|---|---|---|
| Acrylic Latex | Wide color range, relatively affordable | May not be as durable as specialized paints, susceptible to moisture damage | Moderate | Moderate |
| Acrylic-urethane | Superior durability and resistance to moisture and UV, better adhesion | Slightly more expensive than latex | High | High |
| Manufacturer-specific Hardie Board Paint | Formulated for optimal performance on Hardie board, often includes primer | Primarily higher cost | High | High |
Note: Cost and durability are relative and can vary depending on the specific paint brand and application method.
Preparation Before Painting: Hardie Board Siding Painting
Proper preparation is crucial for achieving a long-lasting and aesthetically pleasing paint job on Hardie board siding. This involves meticulous cleaning, addressing any damage, and using appropriate primers and sealers. A well-prepared surface ensures even paint application, minimizes issues like peeling or bubbling, and maximizes the longevity of the paint job.
Thorough preparation is the key to a successful paint job on Hardie board. Ignoring this crucial step can lead to premature failure, necessitating additional repairs and repainting in the future. This section details the essential steps in preparing Hardie board siding for a smooth and enduring paint application.
Cleaning the Siding
Thorough cleaning removes dirt, mildew, and loose debris that could interfere with paint adhesion. High-pressure washing is often effective, but be cautious not to damage the siding. Use a gentle spray to avoid compromising the siding’s integrity. For stubborn stains or mildew, a solution of mild detergent and water may be necessary. Allow the siding to dry completely before proceeding to the next step.
Addressing Damaged Areas
Damaged or deteriorated areas of the siding must be repaired before painting. This includes patching holes, cracks, or areas with significant damage. Properly addressing these areas ensures that the paint adheres to the siding evenly and avoids future problems.
Using Primers and Sealers
Primers and sealers are essential for a successful paint job. Primers create a smooth, uniform surface for paint to adhere to, while sealers prevent moisture from seeping into the siding and creating issues. The selection of primer and sealer should be based on the specific type of Hardie board siding and the desired outcome. Consult the manufacturer’s recommendations for appropriate products.
Patching Holes and Cracks
Patching holes or cracks in the siding is a crucial step. Use a patching compound specifically designed for exterior use. Ensure the compound is properly mixed and applied according to the manufacturer’s instructions. Allow the patch to dry completely before proceeding to the next step. A detailed procedure for patching follows:
- Clean the area thoroughly, removing any loose debris or dirt.
- Apply a thin layer of patching compound to the hole or crack, ensuring complete filling.
- Smooth the compound with a putty knife or trowel for a seamless finish.
- Allow the patch to dry completely, following the manufacturer’s instructions.
- Sand the patched area to create a smooth surface that’s ready for priming and painting.
Required Tools and Equipment
The following table lists essential tools and equipment for preparing Hardie board siding for painting:
| Tool/Equipment | Description |
|---|---|
| High-pressure washer | Removes dirt, mildew, and loose debris. |
| Soft-bristled brush | For cleaning hard-to-reach areas or delicate siding. |
| Mild detergent solution | For stubborn stains or mildew. |
| Putty knife or trowel | For applying the patching compound. |
| Patching compound | Specifically designed for exterior use. |
| Sandpaper | For smoothing patched areas. |
| Primer and sealer | Ensures proper adhesion and moisture protection. |
| Paint tray | For holding paint. |
| Paintbrushes or rollers | For applying primer and paint. |
Choosing the Right Paint
Selecting the appropriate paint for your Hardie board siding is crucial for achieving a lasting, attractive finish. The right paint will not only enhance the aesthetic appeal of your home but also protect the siding from the elements, ensuring its longevity. Factors like color, durability, and cost all play a role in making the optimal choice.
Choosing the right paint involves careful consideration of several key factors. The desired aesthetic, the expected lifespan of the paint job, and the budget all need to be weighed against the performance characteristics of different paint types. Different finishes offer varying levels of protection and reflectivity, and understanding these distinctions is essential for making an informed decision.
Factors to Consider When Choosing Paint
Understanding the various factors influencing your paint selection is paramount. Color selection, while seemingly subjective, can significantly impact the overall look and feel of your home. Durability is a critical consideration, as it directly affects the longevity of the paint job. Cost is an important factor; balancing quality with affordability is a key aspect of the decision-making process.
Paint Finishes
Different paint finishes offer varying levels of reflectivity and protection. Matte finishes, characterized by a flat surface, provide a subtle, low-sheen appearance. Satin finishes strike a balance between a smooth look and moderate reflectivity. Gloss finishes, with their high sheen, offer a bright, reflective surface. The choice of finish depends on your preference and the desired level of protection and reflectivity.
Importance of Paint Adhesion
Paint adhesion is crucial for a long-lasting finish. Adhesion refers to the paint’s ability to bond firmly to the Hardie board surface. Poor adhesion can lead to peeling, bubbling, or other issues over time. Proper surface preparation is essential to promote strong adhesion, and the quality of the paint itself plays a critical role.
Paint Brands for Hardie Board
Several reputable paint brands consistently demonstrate excellent performance on Hardie board. These brands have established track records for durability and adherence to Hardie board siding. Choosing a trusted brand can significantly increase the likelihood of a long-lasting, problem-free paint job.
Paint Options for Hardie Board
| Manufacturer | Finish | Typical Price Range |
|---|---|---|
| Benjamin Moore | Satin | $30-$50 per gallon |
| Sherwin-Williams | Matte | $25-$45 per gallon |
| Behr | Semi-Gloss | $20-$35 per gallon |
| PPG Paints | Satin | $28-$48 per gallon |
| Valspar | Matte | $22-$38 per gallon |
Note: Price ranges are approximate and may vary based on specific product and retailer.
Painting Techniques
Proper painting techniques are crucial for achieving a professional and long-lasting finish on Hardie board siding. Careful application minimizes wasted paint, ensures even coverage, and prevents common issues like drips and runs. Understanding the best tools and methods for different situations is essential for a successful painting project.
Application Techniques
Effective painting requires a methodical approach. Begin by ensuring the surface is thoroughly clean and free of debris, and that the paint adheres properly. Apply thin, even coats, allowing each coat to dry completely before applying the next. This prevents runs and ensures consistent color. Overlapping brushstrokes, if using brushes, will minimize visible brush marks. The proper application technique can significantly impact the longevity and appearance of the finished siding.
Choosing the Right Tool
The selection of tools significantly impacts the painting process. Different tools are best suited for various tasks and surface areas.
- Brushes: Ideal for detailed work, corners, and edges, brushes provide excellent control and precision. Natural bristle brushes often work best for oil-based paints, while synthetic brushes are a good choice for water-based paints. A high-quality brush with good-quality bristles is essential for creating a clean and professional finish.
- Rollers: Rollers are generally the most efficient tool for large, flat surfaces. Different nap lengths of rollers cater to various paint types. A roller with a longer nap will be suitable for paints with a higher viscosity, allowing for more even coverage. For large, uniformly colored areas, rollers can save considerable time and effort compared to brushes.
- Sprayers: Sprayers are the fastest method for covering extensive areas of Hardie board siding. However, careful technique is necessary to prevent overspray and uneven coverage. Proper sprayer maintenance and careful nozzle adjustment are crucial to achieve an even, high-quality finish. Spraying is best for large, flat areas, where even coverage is important.
Ventilation and Timing
Proper ventilation is essential for a safe and successful painting project. Adequate airflow prevents paint fumes from accumulating, which can cause health issues. Open windows and doors, or use fans to improve ventilation. The ideal time for painting Hardie board siding is during the warmer months when the weather is dry and sunny, with temperatures between 60-80°F. This prevents moisture build-up, which can lead to paint problems and delays.
Efficiency and Waste Reduction
Planning and organizing your approach can significantly reduce paint waste and maximize efficiency. Divide large areas into manageable sections to ensure consistent coverage and prevent fatigue. Use a consistent and overlapping pattern, applying thin coats of paint.
Preventing Drips and Runs
Paint drips and runs can mar the finished product. Applying thin coats, ensuring adequate drying time between coats, and working with the proper consistency of paint will reduce these issues. Proper technique is key to preventing drips and runs.
Painting Methods Comparison
| Painting Method | Advantages | Disadvantages |
|---|---|---|
| Brushes | Excellent control, detail work, precise edges | Time-consuming for large areas, can be laborious |
| Rollers | Efficient for large, flat areas, good coverage | Can be challenging for intricate details, and less control over the finish |
| Sprayers | Fastest for large areas, even coverage | Requires more skill, risk of overspray, and can be noisy |
Maintaining Painted Hardie Board Siding

Proper maintenance is crucial for preserving the beauty and longevity of your painted Hardie board siding. Regular upkeep helps prevent premature wear and tear, extending the lifespan of your investment. Consistent attention to detail ensures your siding retains its attractive appearance and protects your home from the elements.
Maintaining your Hardie board siding involves a combination of preventative measures and prompt responses to minor damage. This proactive approach minimizes the need for extensive repairs and ensures your siding remains a strong and visually appealing feature of your home.
Regular Cleaning
Regular cleaning is essential for maintaining the aesthetic appeal and longevity of painted Hardie board siding. Dirt, grime, and mildew can accumulate, leading to discoloration and a less attractive appearance. Furthermore, these accumulations can impede the paint’s ability to protect the underlying siding material, accelerating deterioration.
- Frequency: Clean your Hardie board siding at least twice a year, or more frequently if exposed to heavy pollution or high pollen seasons. Spring and fall are ideal times for a thorough cleaning, but a quick wipe-down or pressure washing during summer can help prevent build-up.
- Methods: Mild detergent solutions, combined with soft-bristled brushes or a power washer, are suitable for most Hardie board siding. Avoid harsh chemicals or abrasive materials that could damage the paint or siding. A soft-bristled brush is ideal for cleaning areas around windows and vents. Power washing should be done with a low-pressure setting to avoid damaging the siding.
Addressing Minor Damage
Prompt attention to minor damage is crucial for preventing larger issues. A chipped or scratched area can quickly escalate into a significant problem if left untreated. Early intervention helps maintain the integrity and aesthetic appeal of your painted Hardie board siding.
- Minor Scratches/Chips: Use a touch-up paint that precisely matches the existing siding color. Apply the touch-up paint in thin, even coats, ensuring complete coverage of the damaged area. Allow the paint to dry completely before proceeding. A touch-up pen can be helpful for smaller areas.
- Loose Paint: Use a putty knife to gently remove any loose or flaking paint. Clean the area thoroughly, and then apply a fresh coat of matching paint. For larger areas of loose paint, consult a professional painter.
Protecting from Harsh Weather
Protecting your painted Hardie board siding from harsh weather conditions is essential for preserving its appearance and longevity. Extreme temperatures, heavy rainfall, and strong winds can contribute to paint degradation.
- Extreme Temperatures: Extreme temperature fluctuations can cause paint to crack or peel. Protecting the siding from direct sunlight or prolonged exposure to intense heat can help mitigate this. Likewise, minimizing exposure to prolonged freezing temperatures is equally important.
- Moisture: Excessive moisture can promote mildew and rot. Ensure proper drainage around the home’s foundation to prevent water from pooling near the siding. Consider gutter cleaning to prevent water runoff from damaging the siding.
Identifying Paint Degradation, Hardie board siding painting
Regular inspections are essential for catching signs of paint degradation early. Prompt action can prevent further damage and costly repairs.
- Peeling or Bubbling Paint: Peeling or bubbling paint is a clear sign of deterioration. Addressing these issues promptly can prevent the problem from spreading. Identify the cause and take corrective action to prevent future issues.
- Color Changes: Noticeable changes in the color of the paint, like fading or discoloration, could indicate underlying issues. If this occurs, determine the source and take appropriate steps to maintain the siding’s aesthetic.
Preventive Maintenance Schedule
Developing a preventative maintenance schedule is an effective way to maintain your Hardie board siding. This proactive approach helps to avoid major problems and keep your siding looking its best.
- Quarterly Inspection: Conduct a visual inspection every three months to identify any potential problems, such as loose paint, cracks, or discoloration. This proactive approach ensures early intervention.
- Annual Cleaning: Schedule a thorough cleaning at least once a year to remove dirt, grime, and mildew. This prevents the build-up of pollutants that can harm the paint and the siding.
- Addressing Minor Issues: Create a system to address minor damage as it arises, ensuring that any problems are dealt with promptly to avoid larger issues down the road.
Troubleshooting Common Issues
Addressing potential painting problems on Hardie board siding is crucial for achieving a long-lasting and aesthetically pleasing finish. Proper identification and resolution of issues like peeling paint, blistering, or uneven coverage can save time and money in the long run. This section addresses the common problems, their causes, and effective solutions for different paint types.
Identifying and rectifying problems early in the painting process can prevent more significant issues later. Careful attention to detail throughout the painting process is key to achieving a professional-looking result.
Peeling Paint
Peeling paint on Hardie board siding often indicates underlying issues with the preparation process or paint compatibility. Moisture trapped beneath the siding or inadequate surface preparation can lead to this problem. Poor adhesion between the paint and the substrate is another common cause.
- Cause: Improper surface preparation, including inadequate cleaning or the presence of moisture or contaminants. In some cases, incompatible paint types or poor weather conditions during application can be factors.
- Solution: Carefully scrape off the peeling paint, thoroughly clean the affected area with a suitable cleaner, and apply a bonding primer to promote adhesion. Ensure the surface is completely dry before applying the topcoat.
Blistering
Blistering, characterized by raised bubbles in the paint film, is often caused by trapped moisture or inadequate surface preparation. The presence of moisture beneath the paint surface can create pressure, causing the blisters to form.
- Cause: Incomplete surface preparation, inadequate drying time between coats, or high humidity during application. Using a paint not compatible with the Hardie board siding can also be a contributing factor.
- Solution: Carefully scrape off the blistered paint, clean the affected area thoroughly, and apply a bonding primer to ensure a solid foundation. Consider using a paint specifically designed for exterior use and ensure appropriate drying times between coats. If humidity is high, consider postponing the project until conditions improve.
Uneven Coverage
Uneven coverage often stems from inadequate paint application techniques, inconsistent brush strokes, or insufficient paint coverage per coat. Using insufficient paint can also result in uneven coverage.
- Cause: Improper application techniques, using too little paint per coat, or variations in brush strokes. Inadequate stirring of the paint before application can also be a contributing factor.
- Solution: Ensure proper paint application techniques, applying enough paint to achieve even coverage, and maintaining consistent brush strokes. Stir the paint thoroughly before application to ensure uniform consistency. If necessary, apply additional coats, ensuring each coat is properly dried before proceeding.
Paint Discoloration or Fading
Discoloration or fading can result from exposure to UV rays, environmental factors, or the use of inappropriate paint types. Excessive sunlight can degrade the paint’s pigments, leading to discoloration over time. The quality of the paint itself can also influence the longevity of the color.
- Cause: Exposure to UV radiation, environmental factors such as extreme temperatures or moisture, and the use of low-quality paints that are not formulated for outdoor use.
- Solution: Apply a paint specifically formulated for exterior use and designed to withstand UV exposure. Regular maintenance and repainting can help mitigate the effects of fading and discoloration. Use paints with UV inhibitors for added protection.
Repairing Minor Damage
Minor damage to the paint job, such as scratches or small chips, can be effectively repaired with touch-up paint. The type of paint used for touch-ups should ideally match the existing paint.
- Cause: Physical impacts, such as scratches or chips, or minor imperfections.
- Solution: Clean the affected area thoroughly. Apply a small amount of touch-up paint using a fine brush or a touch-up pen, ensuring even application. Allow the touch-up paint to dry completely before proceeding.
Troubleshooting Different Paint Types
Different paint types might require specific solutions for addressing issues. Acrylic paints, for instance, typically require more careful attention to drying times, while latex paints are more forgiving.
- Acrylic Paints: Pay close attention to the manufacturer’s recommendations for drying times and application techniques.
- Latex Paints: Latex paints are generally more forgiving regarding application techniques, but maintaining adequate ventilation is still crucial.
Table of Common Problems and Solutions
| Problem | Cause | Solution |
|---|---|---|
| Peeling Paint | Improper prep, moisture, incompatibility | Scrape, clean, prime, reapply |
| Blistering | Moisture, inadequate drying | Scrape, clean, prime, reapply |
| Uneven Coverage | Inadequate application, insufficient paint | Ensure proper technique, and use enough paint |
| Discoloration/Fading | UV exposure, environmental factors | Use UV-resistant paint, regular maintenance |
Visual Examples and Illustrations

Source: pinimg.com
A well-painted Hardie board siding provides a lasting, aesthetically pleasing exterior for your home. Visual examples, paired with detailed descriptions, are crucial in understanding the various aspects of the painting process and the results of proper and improper execution. These examples illustrate the key factors that contribute to a successful paint job, from meticulous preparation to the final finish.
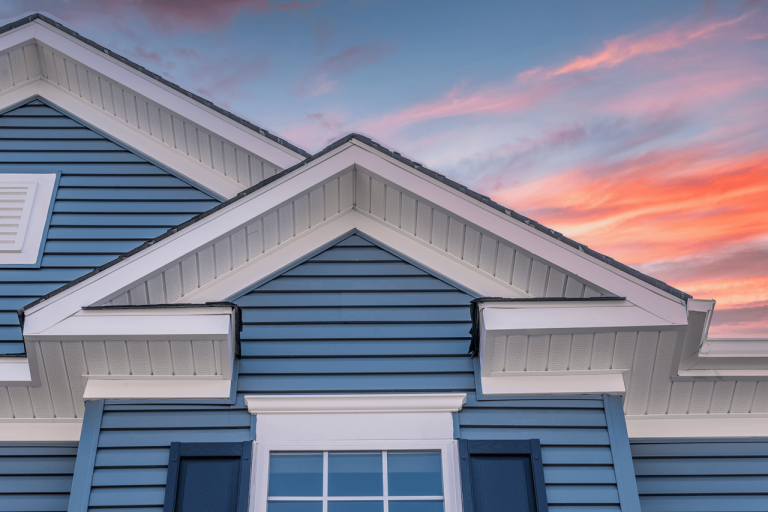
A Well-Painted Hardie Board Siding Example
A well-painted Hardie board siding exhibits a uniform, smooth surface with a consistent color throughout. The paint adheres tightly to the board without drips, runs, or brushstrokes visible. The application is even, and the paint shows no signs of bubbling, cracking, or peeling. Colors are vibrant and true to the chosen shade, creating a harmonious and attractive facade. Properly prepared surfaces, utilizing the correct primer and paint, are crucial for achieving this flawless result.
Various Painting Techniques in Action
Different techniques are suitable for various application needs and siding configurations. A good example is using a brush for intricate areas, such as corners and trim, while a roller is best for large flat surfaces. A sprayer may be necessary for large-scale projects. Proper technique ensures consistent coverage and a smooth finish. The use of a high-quality paint sprayer, coupled with a skilled operator, can lead to a more even and uniform finish on large areas, saving time and effort.
Importance of Proper Surface Preparation
Thorough surface preparation is the foundation for a lasting paint job. Visual examples of a poorly prepared surface will reveal imperfections like dirt, dust, mildew, or loose debris. A well-prepared surface, on the other hand, is clean, free of contaminants, and properly primed. This ensures the paint adheres properly and prevents premature deterioration. The use of wire brushes, pressure washers, or scraping tools to remove loose materials is often necessary to remove contaminants and improve the surface’s readiness for paint application.
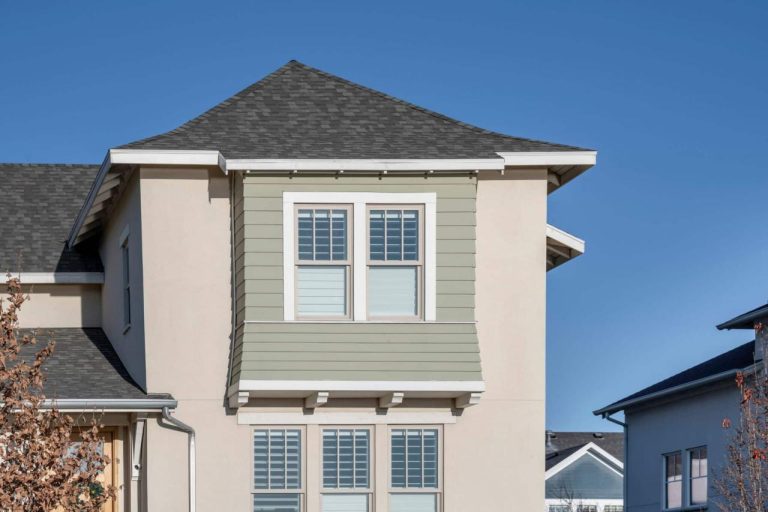
Impact of Different Paint Finishes
The chosen paint finish significantly impacts the siding’s appearance. A flat finish, for instance, conceals imperfections well, while a satin or semi-gloss finish offers a higher level of sheen and highlights the texture of the siding. A high-gloss finish provides a more reflective surface, making the siding appear brighter. A visual comparison of these finishes will demonstrate how each impacts the aesthetic of the home.
A Poorly Painted Hardie Board Siding Example
A poorly painted Hardie board siding example often exhibits visible brushstrokes, uneven color application, drips, and runs. The paint may be visibly lifting in certain areas, exhibiting cracking or bubbling. These issues can stem from improper application techniques, inadequate surface preparation, or the use of unsuitable paint for the Hardie board material. In severe cases, peeling or blistering might be evident, compromising the siding’s integrity.
Visual Impact of Good vs. Poor Maintenance
Visual examples comparing good and poor maintenance highlight the importance of regular upkeep. Good maintenance, including regular cleaning and touch-ups, will maintain the paint’s pristine appearance and extend its lifespan. Conversely, neglected siding will exhibit faded, chipped, or stained areas, diminishing the curb appeal of the house. This deterioration can happen due to weather exposure, environmental factors, or lack of regular maintenance.
Closing Notes
In conclusion, painting Hardie board siding is a multifaceted process requiring meticulous preparation, the right tools, and proper application techniques. This guide has provided a comprehensive overview of the entire process, from initial surface preparation to long-term maintenance. By following the steps in Artikeld, you can achieve a beautiful and durable finish that enhances the aesthetic appeal and longevity of your home’s exterior. Remember to consider factors like paint type, application method, and regular maintenance to ensure the best possible outcome.